The Drywall Plug Patch


Eighteen years ago, I discovered a fast, simple and effective way to repair small holes. I've used it hundreds of times since then and always with excellent results. Although I have seen some relatively large patches made using this technique, I would not use this method on any repair over 6" x 9". It is especially well suited to repairing holes left from moving electrical boxes, for example. These photos illustrate the process of the drywall plug patch.
Joint compound and some basic drywall tools, along with a scrap of drywall are all that are required for this simple repair.
Step 1
Cut a drywall patch that roughly overlaps the hole 1-1/2" on all 4 sides. Hold the patch up to the hole and score the back of the board with a razor knife.
PRO TIP!!! It is not necessary to measure and layout the board to score it. Just hold a patch like this up next to the hole and score it. This will save you some time.
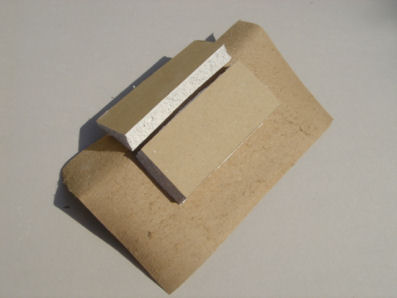
Step 2
Snap the board along the scored lines and peel back the scrap leaving the face paper intact on the plug patch.
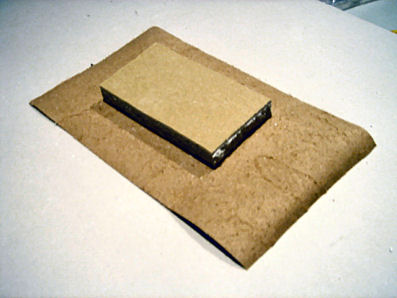
Step 3
This is a properly prepared plug patch.
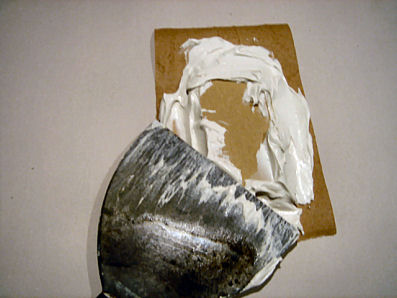
Step 4
"Mud" the back of the patch using All-Purpose joint compound. Make sure that all edges are completely covered to prevent any voids in the finished repair. If you are in a rush or you want to make a stronger drywall repair you can use a Lightweight setting type joint compound instead.
Step 5
Set the plug patch into the hole so that the face of the board in the center of the patch is flush with or slightly below the level of the surrounding drywall. In drywall terms, that means about 1/32” or less. The closer you get to being flush without being higher than the surrounding board the easier, faster and better looking the repair will be. The most important thing is to make sure that the repair is not higher than the surrounding drywall.
Step 6
Use a broadknife to smooth and embed the paper flaps surroudning the repair. The flaps serve the same purpose as drywall tape and must be embedded in the same way.
PRO TIP!!! It only takes a very thin layer of joint compound to properly adhere the face paper on the drywall to the paper of the flap. Use your broadknife to squeeze as much mud out as you can so that the repair is as low and tight to the wall as possible.
Step 7
Finish the repair, using a 10" knife and a couple of coats of drywall joint compound, to featheredge and paint.
PRO TIPS !!! When finishing drywall 2 thin coats are always better than 1 heavy coat. Try sponge sanding instead of dry sanding to avoid creating that fine white dust that gets everywhere.
If you have any comments or questions, you can post here or visit goceilingmedallion.com. If we have been able to help you out in any way, we’d love to hear about that, too. We’ll post your comment on our website.
posted by Pat Tomaskovic @ 9:54 PM PERMALINK
![]()
![]() Social bookmark this
Social bookmark this

0 Comments:
Post a Comment
<< Home